B20 Swap. By Ben Ogle

The B20Z rules in a 2000lb EF. I cant even really describe it (besides saying "Whoa. Torque. Fun"). You would just have to drive my car. Here's how to put one in your car.
Terms:
B20 - motor from CRV's. up to 98 is 8.8:1 comp B20B, 99-2000 in USDM is 9.6:1 comp B20Z, 99-2000 JDM is 9.6:1 comp B20B
IM - intake manifold
TB - throttlebody
TPS - Throttle position sensor
IACV - intake air control valve
FITV - Fast idle thermo valve
What you need (the basics):
An EF
B20B/Z long block
Mount kit
B-series cable tranny and clutch of the same generation
B-series flywheel
90-93 integra axles and intermediate shaft
Non-Hf/STD knuckles
MPFI harness you can cut up (if you have a DPFI car)
OBD0 injectors
Injector resistor box (from any OBD0 MPFI Honda)
B18A OBD0 distributor
PR4 or PM6 ECU
A complete low rise intake manifold with matching throttle body
Probably some other stuff I cant remember.
Pre-swap
This swap is a lot like a B18a swap. I should know, I had one of those in my car for a while. But there are a couple of notable exceptions that can make this swap a slight pain in the ass.
One exception is the fact that you cannot get it as a full swap, only long blocks, and another is the CRV intake manifold dilemma. These motors came out of CRV's and you cant use most of the stuff that the motor would come with as a full swap; i.e. tranny, ECU, most of the intake manifolds, axles, etc. This sucks because there are always things you don't realize you need when you are gathering parts for the swap. Worse yet is that I cant tell you everything you are going to need because I don't know how complete the parts you buy are going to be. The best thing I can tell you to do is to buy a complete OBD0 B18A swap then sell the B18 long block. But even then you may not get everything you need because full B18A swaps come from USDM integras and the original owner of the motor may have used some parts off the motor. Another thing I can tell you is parts to look for that can be hard to find if they don't come on your swap.
TPS - for some reason people like to keep and/or use these. Unfortunately you can't buy them by themselves. No, you have to buy a whole throttle body. If you are using a B18 IM these can be had for around $40 at a junkyard if you can find one. If you have a B20 TB/IM you are using and you didn't get a TPS you can get a B18A TB from a junkyard and put the TPS on the B20 TB.
FITV and IACV - My B18A swap didn't come with these and I had a hard time finding them for a reasonable price. Don't buy them from the dealer cause they are EXPENSIVE. Get some used because both parts can easily be cleaned.
Fuel rail - Seems simple to find, eh? Yeah, I had trouble with finding one of these too. If you need one try and get one with ALL the hardware. This includes the spacers (for b18 IM usage), fuel line (any MPFI one will do), fuel pressure regulator, fuel line washers, and the fuel line nut (why does no one sell these?!).
Intake manifold dilemma:
If you ended up with one of the earlier B20s you probably have a really tall IM. You cannot use this, it doesn't fit under your hood. Fortunately the IM bolt pattern is the same as the B18A/B family and of course the same as the B20Z and the later JDM B20B. Sooooo, you have to use an IM off one of these motors or get a Skunk2 IM. If you are going for a stock one, try and get a B18B IM. They are regarded as the "best" flowing of the bunch. The 92-93 B18A manifolds come in second and the 90-91 B18A IMs are a close third. The short B20B manifolds look to be lot like the B18B manifolds but I dont know if there are any large differences. So right now I am going to assume they are similar enough that you wouldn't feel the difference on your car (if I am wrong let me know). Maybe these pics (thanks goes to daver for them) will convince you that you should try and find a B18B or B20B manifold:

Note the larger ports on the B20 manifold. B20s need to breathe. You can also see that the runners are shorter an more straight than the B18's:

I'm not exactly sure where the B20Z manis fit into all this but it has shorter, fatter runners than the 90-93 manifolds and a larger plenum as well. They are said to be "about" the same as the B18B manifolds. There are, however, some issues that need to be taken care of when using the B20Z IM.
If you go for one of these stock manifolds get it COMPLETE.
If you opt for the Skunk2 manifold you will need to get a whole bunch of parts from a stock B18A/B manifold. You will need: complete TB, complete fuel rail, injectors, IACV, throttle cable bracket, etc.
Using the B20Z mani:
If you are using this it is probably because it came on your motor. That is why I used this manifold. It really isn't an abnormally great mani and isnt available enough to hunt down a complete one, but you can use it so I'm gonna cover it.
First order of business - Fill that hole!!
Look at the picture and if you cant see the hole then you should stop reading here and go browse through www.superhonda.com.

In the words of my friend - "uhhh…that might cause a vacuum leak"
The original hole filler was a plenum expansion chamber thing but it does not fit under your hood:

So I made a plug out of UHMW plastic. I just turned the thing to the same size as the original chamber then put the chamber's rubber seal on my plug. The plug is the white thing at the top:

#2 on the agenda - fix the throttle cable position.
The stock throttle cable on the CRV is positioned vertically. This sucks because you don't have room and because you probably didn't get the bracket on your TB. There are a couple of ways around this. You can either use a B18A throttle body or swap the B18 throttle pulley onto the B20 TB. You probably want to use the B20 TB because it has a 60mm bore as opposed to a 58mm bore on the B18 TB. No matter which way you do this you will end up with a TB that pulls the right way.
Now that you've made the thing pull the right way you have no way to hold the stationary end of the throttle cable. Fortunately for us Honda tapped some holes just about where the holder would go. But the holes don't fit any stock Honda cable holder (that I know of. if you know let me know, know what I'm sayin?) so I made my own. Look back up to the last picture for a view. The part that I used to actually hold the cable is a 100% unmodified B18A cable holder. The part that holds the holder is an 1/8" piece of steel with 4 holes in it. If you have a drill, a vice, and a hammer this is a very possible part to make.
Notice how the cable holder is right in between the 2 bolts that hold the thing to the IM? If I made this part again I would have moved the actual cable holder back (to the right of the pic) about a half inch so it would have more grab on the cable. So if you are making this I would suggest doing that.
#3 - put OBD0 injectors in that biatch.
The injectors I got with the motor were physically really small (short and skinny) compared to the OBD0 ones so I didn't want to use them. If you want to use the CRV injectors then go right ahead. But if you don't then read further.
The only problem fitting the B18 injectors is that they are taller. How much taller, you ask? They are taller by one b18 fuel rail spacer. Know what you have to do? Use the B18 fuel rail spacers. But you have to put them UNDER the fuel rail studs. There is no way you could fit them on the top.
Now, you take your fuel rail spacers (3 of them) and drill out the center to the right size. I don't know what it is off the top of my head but I'm sure you can figure it out. Then you take off each stud, put the spacer on and put the stud back on the IM. Now the OBD0 injectors will fit without problem. This is what it looks like when you are done:

Swapping it in
Now that you are done fiddly-fucking around with the IM and part gathering you are ready to put it in. I am assuming that you have already put the tranny, int shaft, complete IM, B18a dist, and the rest of the crap on the motor.
Step 1 - Pull out your old motor. Read your Haynes/Helms/Chiltons manual on how to do this. If you don't have a manual go and buy one. Pull out your radiator too. Some people don't and I cant figure it out.
Step 2 - Clean your engine bay. Do it you lazy foo.
Step 3 - If you have a 3 mount mount kit, cut the front mount bracket off the cross member. I did this with a porta-band on my car and with one of those spot weld drill bits (stupidest tool ever invented) on the last car I helped with. The spot weld bit did a nicer job but was a HUGE pain in the ass. Either way this makes the motor go in sooooooooooooo much easier.
Step 4 - Make a large dent in the driver side frame rail right under the little rectangle cut out below the shock tower. The dent is provision for the alternator pulley. Make another dent right in front of the rear mount on the rear cross member. This is for the rear mount bracket. This step can be saved for after or during step 5 if you don't like wiring.
Step 5 - Wiring. If you have a MPFI car you can skip this step. If you have a DPFI car you need to wire for MPFI. Another MPFI wiring link is here.
Step 6 - Put the driver side mount on the motor and put the rear mount on the cross member. Torque the rear mount as there is no getting in there with a motor in the way. Leave the pass side mount off the tranny, the rear mount bracket off the motor, and the header off there right now. They just get in the way.
Step 7 - Put the motor in. Hoist it up and lower it into the engine bay. They like to go in tranny first and I let them. If you didn't cut off the front mount bracket you will be saying "you know, that Ben Ogle guy was right," I promise. At any rate, lower the tranny really far down in the bay and then put the passenger side mount on the tranny. Raise it up and get both the side mounts in their respective places and start the bolts.
Now that the motor is held up by the car, put the rear mount bracket in. It takes some wiggling of the motor and maybe a little moving with the hoist but it is better to do it now than earlier. If you do it earlier, the rear mount bracket will hang up on the rear mount when you are getting the motor situated causing a pissed off swapper.
Step 8 - Connect everything. The cool thing about this swap is that there are really no vacuum lines. There isn't even a place to put that red vacuum line that comes from the canister, the MAP sensor is in the way. So I just took all the canister and purge control solenoid valve crap out. Yep, out. You can even take off the stock MAP sensor because the B20 TB has one and it plugs right in.
If you take out the canister then don't plug the line coming out of the firewall. Just let it vent. I have been told by a few good sources that there are no ill effects of leaving this line open. Plus if you plug it the fuel system will have too much pressure. I plugged it at first and ended up bursting the main, filter-to-engine, fuel line (the same fuel line that was fine on my B18A).
Conclusion:
I know that the swap steps are over simplified but I only left out stuff that you either know or can find out fairly easily. This wasn't supposed to be a completely comprehensive guide. All I really wanted to tell you about the stuff that makes this swap different from a normal B18A swap.
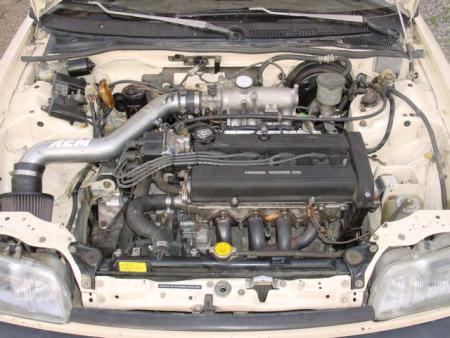
Here it is, done and running:
Home