More Shock Travel. By Ben Ogle
There are a few ways to go about gaining precious shock travel on your lowered car and I am going to try and explain all of the easily (or fairly easily) attainable methods. But remember that shock travel isn't everything. There is a point where your upper control arms will interfere with your inner fender wells and that type of bottoming is much more violent than hitting the bump stops.
Method 1. - shorter shocks.
Get shorter shocks. That's probably the easiest and most expensive way. A lot of the "full" coilovers have this feature. If you have the money this is regarded as the "best" way to go about gaining shock travel.
Method 2. - the top hat method.
In this method you just increase the distance between the top of the spring and where the top of the shaft mounts to the top hat. What this does is delays the bottoming of the top of the shock body (or the bump stop I guess) to the top of the top hat.
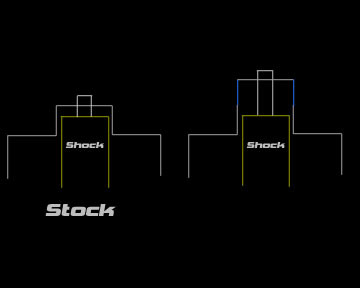
See that with the modified top hat (extended in blue) the shock body can travel up further into the top hat without bottoming.
Ground Control makes taller top hats like this that add ½" - ¾" of shock travel.

But you can also make your own. There is a great writeup on this here.
Method 3. - drop forks.
This method only works for your front shocks. The general idea is to shorten the distance between the bottom of the shock body and the lower control arm. This lowers the shock body in relation to the top of the top hat and thus allows it to travel further up without bottoming. If you are reasonable and only attempt gain up to about an inch the bottom of the shocks will NOT interfere with the axles. There is 2 ways to do this the drop fork way.
1 - buy drop forks. This is good advice but good luck finding them. Suspension Techniques used to make EF/DA drop forks but they had problems with them breaking so the parts were discontinued.
2 - slip your original forks up higher on the shock. If you have a shock that does not have brake line brackets like koni yellows then this is easy. You slip the fork up as high as it will go on the shock and either make a dent or grind a divot higher up on the shock than the stock one for the bolt. I did this on my konis but instead of grinding on the shock I ground the bolt down so it wouldn't interfere with the shock.
If you own a shock that has brake line brackets you can either take them off (which is covered here, scroll down a little.) or if you don't want to void your shock's warranty you can buy and modify some DC/EG forks to slip over the bottom of the brake line brackets.
I have done the EG/DC fork mod so I might as well share it with you:
Goal:
You want to go from this:

to this:

You gain a good 3/4" of travel (maybe more) with this mod which is much needed on a lowered car.
This little project took me 4 hours. But I was moving slow. After I figured it out I did the 2nd side in about 30 min.
Process:
1) First go buy some forks. Mine were off an EG because that's what I could find. The EK ones looked the same but I didn't want to take any chances. Mine were $20 at the junkyard.
EF fork on left EG fork on right:

See, they are a little different shape but it happens. They are the same height and the EG ones have a bigger inside diameter. The EF/DA forks have an ID of 1.502" and the EG ones were 1.650".
Bigger dia of the EG fork on the right:

2) Measure:
Next you have to measure the dia of the brake line bracket (where the fork slips over). Mine happened to be 1.71". But they do come in different sizes. My stock teg ones were around 1.6" and the stock EF ones were about 1.8". This determines how much you have to "bore" out the forks.
3) Grind:
Now its grinding time. I used our little air die grinder with a stone bit. I tried a bunch of different bits like drum sanders, and different gnarly looking metal bits. None worked except for the stone bit. If you have a dremel with a little stone bit this will take a LONG time.
I clamped the fork in the vice and ground the top 3/4" of the inside diameter to about 1.71". I measured the ID with a caliper periodically and test fit occasionally. Grinding takes a while because the forks are very hard.
4) The spacer:
The fork is only clamping to the shock with the top 3/4" and I didn't want anything wobbling around so I made a little spacer. Now the bottom of the clamp has something to grab onto. I took a piece of 1/16" aluminum that was 4.5" long and 3/4" wide and bent it around one of my old stock shocks.

It slides between the fork and the shock like so:

5) The bolt:
I didn't want to void my shocks' warranty so I wasn't about to put a little divot on the shock. Instead I ground the bolt down. I put the bolt in the fork to where it starts to get tight and, with the die grinder, made the bolt the same shape as the inside of the fork. Then I took the bolt out and made it the same shape all the way around with the bench grinder.
6) Assembly:
Put the spacer on the shock. Then put the fork on the LCA (first) and connect the shock to the fork. You have to rotate the shock about 2 degrees from its original position because of the clearance between the fork and the brake line brackets. Tighten the bolts and you have more travel. Easy, eh?
If you were greedy you could probably get an inch or more out of this mod by taking .25" or more off the top of the fork and sliding it up on the shock more, but I'm not going to try it.
Home