Homestead-Miami Speedway Track Guide
Published: February 17, 2018
Homestead-Miami Speedway is a roval, meaning it is a permanent oval track with an attached road course which uses parts of the oval. There are three configurations that are normally used:
Full road course:

Modified road course using Nascar turns 3 and 4:

The oval:

Either of the road course configurations features high and low speed corners, oval into infield transitions, decent straights with nice braking zones and good flow. The modified road course configuration eliminates the turn 13-14 chicane which can be a challenge to navigate depending on car setup, and provides a higher speed entry into turn 1 that's exciting in pretty much any car at the cost of removing several corners.
Turn By Turn - Full Road Course
Turn 1
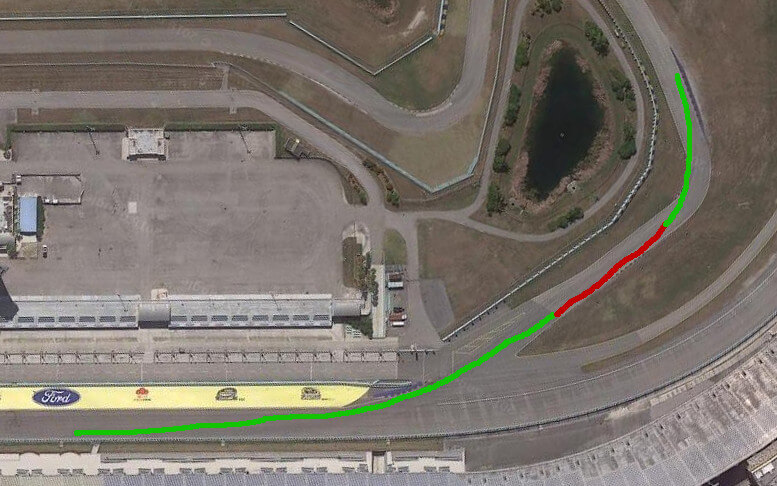
Turn 1 is an oval into infield transition that is characteristic of rovals. In the full road course configuration speeds going into turn 1 are limited by the low exit speed of turn 15 and a relatively short main straight. As such low power cars should have no issue taking turn 1 at full throttle even with intermediate drivers, whereas high power cars will definitely start to experience excitement in turn 1 but usually will not be going fast enough to scare the instructor.
Set up on the right edge of the track next to the wall approaching turn 1, brush the brakes if in a high power car, then smoothly bend the line into the turn with a fairly late apex. Using the apex curb is not recommended, and especially in the full road course configuration it should be easy to keep the car on asphalt throughout the turn which is vertically flatter.
Track out right to set up for turn 2.
Low power:
Turn 2
A medium speed left hander, this turn requires significant braking because cars will be carrying massive speed coming out of turn 1.
A good starting braking point for high power, low grip cars is where the pavement changes from dark to light color. Low power, high grip cars may be starting to brake as late as the beginning of the right side curb.
The turn drives like a late apex corner even in a low power car - the exit may be slippery, producing sooner than expected loss of grip. Track out all the way right to set up for turn 3.
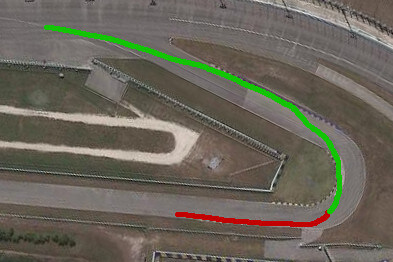
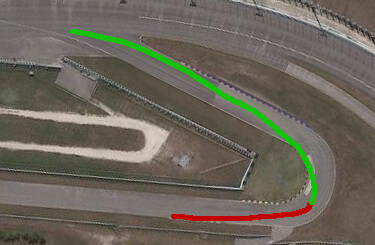
Turn 3
A very long left hander that drives like a decreasing radius corner, because the car needs to be on the left side of the track going into turn 4.
Starting on the right side, brake and turn in with trailbraking as the highest speed that the car will allow. Stable cars with good grip will be able to carry the most speed into turn 3. Get to the inside edge of the track and stay there for a couple of car lengths if the grip permits. Track out a bit between turns 3 and 4 but continue turning and get the car back to the left edge at the turn in point for turn 4.
Low power:
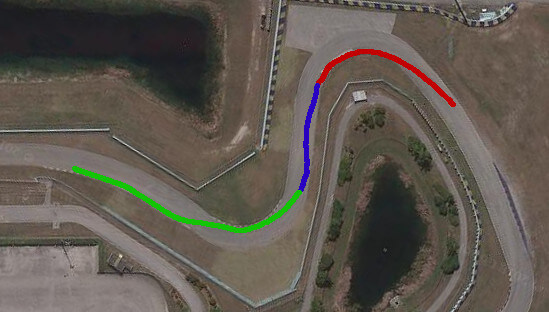
Turn 4
A banked, slow right hander leading onto a substantial straight, this turn can be both tricky and rewarding.
The key in turn 4 is to utilize the banking and have a good visual reference for the turn in point. The banking carries the car through the remainder of the corner, provided the turn in point is correct. Drivers who tend to not use visual reference points will struggle in this corner, and drivers who are good with visual reference points will have good speed and good consistency here.
Turn 5
In a low power car this is a non-turn, as the car can hug the left edge of the track. In a high power car this is a bend; due to low exit speed in turn 4 most cars shouldn't have an issue with running out of track in turn 5 though.
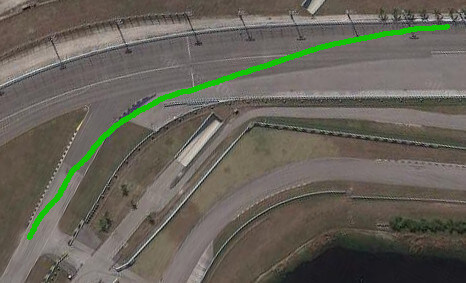
Turn 6
A long right, this turn seems fast because of how wide the track is there but it can actually be a second gear corner in most cars.
Patience is key going into turn 6. An early entry generally will not lead to an off track excursion but the driver will pay for it in lap time, as correct entry into turn 6 is needed to carry throttle through turn 6 exit and turn 7 all the way to turn 8. High power cars especially need to go in deep enough to do most of required direction change early in the corner.
Due to the length of the corner, high power cars with limited grip are likely to benefit from center track entry.
Track out to the left curb, and stay there for a brief moment prior to turning in for turn 7. The steering wheel should be almost completely straightened while the car is holding on the left edge of the track.
Low power:
High power:
The entry is deeper and turn in point is in the middle of the track.
Turn 7
This right hander is, in practice, a continuation of turn 6 exit. The entry point is just past the end of the curb on the left, and most cars will track out left earlier than that when coming out of turn 6 hence would need to stay on the left and wait for the turn in point to arrive rather than maintaining a single arc through both turn 6 and turn 7. A single arc like that generally leads to an early turn in point for turn 7 followed by a late throttle application or a lift.
In low power cars turn 7 is a bend more than a turn. Use the exit curb to maintain minimum steering angle in the car.
In high power cars turn 7 is one of the more exciting areas of the track because the car can be traveling through there at significant speed with significant steering angle, and the front end will be quite light. In a high power car it is critical to adjust the trajectory of the car throughout turn 7 by moving the turn in point, rather than changing steering input when already in the corner.
Turn 8
A slow left, this is firmly a second gear corner and high powered machinery will be dropping many gears in the braking zone.
Aim to use the apex curb; half the time the car won't be on it regardless and the other half it will flatten the line through the corner which is helpful. Track out all the way right at the exit, which I've seen many drivers to not do for some reason.
Like in turn 6, high power, limited grip cars are likely to benefit from a center track entry in turn 8.
Low power:
High power:
The entry is deeper and turn in point is in the middle of the track.
Turn 9
More of a straight than a corner, there is nonetheless one piece of advice applicable in it: driving unnecessary distance costs time, and should be avoided. The line through turn 9 should not be very far off the straight line drawn from the track out point in turn 8 to the braking point in turn 10. This means the car should be on the painted white line with the left front tire around the apex of turn 9, not mid track or further right. Aim the car at the flag light.
Turn 10
This is not really a turn, nothing happens until turn 11.
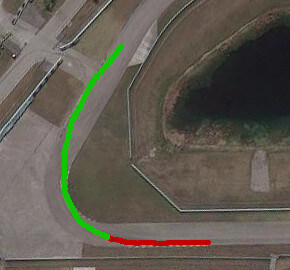
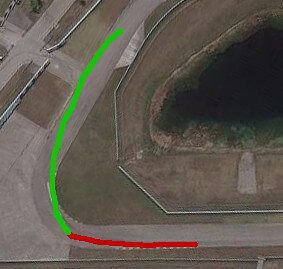
Turn 11
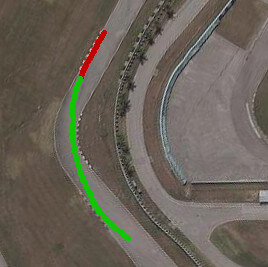
Another oval into infield transition, like turn 1 this is a very fast corner. There is more direction change in turn 11 compared to turn 1, making turn 11 slower than turn 1.
Low power cars can still take turn 11 under full throttle. Unlike turn 1, the apex curb is flat in turn 11 and the entire curb is very usable. In fact, a good low power line is to put the left front tire on the concrete left of the apex curb.
High power cars will need to brake lightly for turn 11, however with curb usage they can also carry a lot of speed into the corner.
While in the turn, the car should aim past the end of the curb on the right, especially high power cars. Aiming at the curb produces a line that tracks out too soon, resulting in the driver holding steering angle when they should be opening the wheel. A good track out point is just past the end of the exit curb.
Stay on the right edge of the track to set up for turn 12.
Low power:
Turn 12
This is close to a 90 degree right hander that requires some braking but not a lot. The key in turn 12 is to start braking early enough to not miss the turn in point, which due to the speed through this corner is also fairly early.
Low power cars can track out all the way right and continue the leftward arc to set up track left for turn 13. High power cars will need to make an effort to get to the left edge of the track for turn 13, which may mean not tracking out completely right coming out of turn 12.
Low power:
Turn 13
This is a very late apex right that is used to set up for the following turn 14. Entry into turn 13 should be on the left; moderate braking is required, and the car needs to be settled in the turn itself to avoid a pendulum effect upon entry into turn 14. It's better to be conservative in turn 13 and get a good exit out of turn 14 than come in hot in turn 13 and be fighting the car in turn 14.
The car should exit turn 13 on the right edge of the track almost parallel to the track direction, which is also entry to turn 14.
Low power:

Turn 14
Starting on the right edge of the track parallel to the track direction, turn in earlier than you would first think to get the car to the apex curbing. When executed correctly the left front tire should be on the apex curbing next to the tire stack that's there. Apply throttle before the apex and carry it all the way to turn 1.
High power cars will need a slightly deeper entry but the corner drives the same way.
Turn 15
The infield into oval transition, this is sometimes made awkward by the cones that the track puts there to separate the oval from the infield. If the cones are there the exit in turn 14 may need to be adjusted to not knock any of them down.
Turn By Turn - Modified Road Course
The differences from the full road course start with turn 10, thus we'll jump right to it.
Turns 10-11
This is the Nascar turns 3 and 4, and how they drive completely depends on the car's power level.
In a low power car, hug the left edge of the track through the entire oval.
In a high power car, start about 2/3 of the way up the banking on entry and go about 1/3 into the corner in terms of track distance. When you see the infield exit into the oval (cones, corner station, track surface junction), point the car to the bottom of the banking and accelerate. This will yield a decent line through turn 11 and the car should be on throttle for more than half of the distance between turns 10 and 11.
Once you are comfortable with this line, apply throttle earlier while maintaining the same line through the last 2/3 of the oval and work on accelerating longer between turns 9 and 10, if you lift prior to turn 10.
Turn 1
Turn 1 will have a much higher entry speed when using the modified road course, and with the higher entry speed it may be advantageous to use the apex curb to flatten the line. Using the curb does unsettle the car though so be careful.
Facilities
The paddock has many garages, possibly owing to the fact that Florida experiences a good amount of rainfall. There are fuel pumps in the paddock, though when I was there with Chin Track Days their hours of operation were very limited - they were open for an hour in the morning and again for an hour in the afternoon. There are no showers on the property, although the restrooms are abundant and well kept.
Best spectating area in the paddock is on top of the garages. The enormous Nascar grandstands are not accessible from the paddock as far as I could tell, unfortunately.