Pocono FUSA ("Formula USA") Track Guide
Published: September 5, 2013
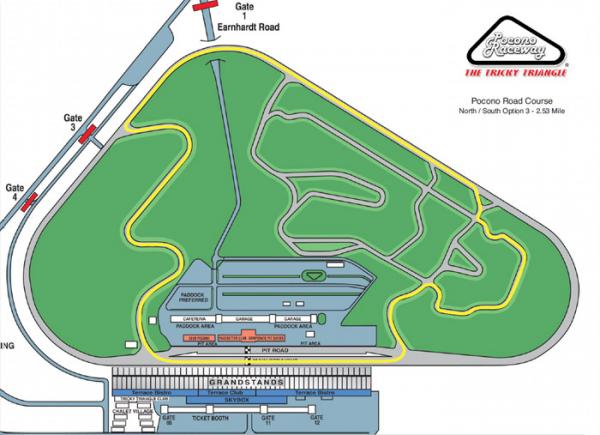
This configuration uses the main straight backwards, North course infield backwards, Nascar turn 2, the Nascar straight between Nascar turns 2 and 1 past the East course, and the South course infield. With the South course chicane, this configuration has 20 turns (unofficially, there are no official turn numbers). The lap time is just under Watkins Glen long course lap time (2:10 on FUSA for a Miata vs 2:20 at the Glen). FUSA configuration combines rather twisty and fairly slow infields on one hand, with the South infield being twistier and slower than North, especially with the optional chicane, and high speed oval to infield entries characteristic of Pocono. The oval to infield entry speeds are lower than in configurations utilizing two Nascar turns such as Long clockwise.
Executive Summary
As with most Pocono configurations, infield to oval turns are of the highest importance for lap time.
While the track map would suggest the South infield is almost a straight, in reality it is anything but. If there is an autocross road course, the South infield, especially with the optional chicane, is it.
The lap rewards small and nimble cars, in particular as far as driver enjoyment is concerned. FUSA configuration is certainly a handling course.
Due to the sheer number of turns and their tightness this track is very braking heavy, especially for larger, heavier and higher power to grip ratio cars.
Turn By Turn
Turn 1
A high speed right from the Nascar main straight into the North course infield. An earlier turn in produces a vertically flatter line through the turn. The "middle" line has a big dip when coming off the oval. I have not attempted a late line.
Watch for cars entering the track on the right.
Depending on how the blend line cones are set up, you may have to run a later apex than ideal, the biggest consequence of which is going over the dip in the oval to infield transition.
Start with a conservative middle line and work on entering faster and earlier. A lot of speed is available in this corner. Higher grip to power cars like Miatas can enter without braking at all, provided they do not suffer excessively over the transition. If you do have to suffer, you can enter without braking and touch the brakes just before the transition to rotate the car more closer to the apex.
The tire stacks at turn 1 corner station are a good apex, but are not always reachable depending on cone setup for pit out. If you cannot hit the apex in turn 1, don't worry about it too much - as long as you do not run out of track on the outside between turns 1 and 2 you are ok.
Turn 2
Another right turn. At lower speeds this turn is independent of turn 1; at higher speeds turns 1 and 2 combine and you should drive a single arc through both. If driving a single arc, be sure to hit the apex of turn 2 and rotate the car enough on the entry into turn 2 to set up for turn 3 on the right half of the track.
Cars with good grip should be accelerating through turn 2.
Turn 3
Braking is required. This is a late apex turn but it tightens and is also quite long. New drivers typically brake too much here. You need to brake just enough to fit into the track between turns 3 and 4.
Turn 4
Braking is again required but not a whole lot. This turn is followed by a short straight, therefore exit speed is important. Track out aggressively.
Turn 5
Late apex, decreasing width turn. Turn just after the entry curbing ends on the right.
Transition from right to left as soon as possible to set up for turn 6.
Turn 6
The most important corner on the track, and also second slowest.
You want to be on power from the apex forward, which means you want to rotate the car before the apex. This requires braking early and sufficiently and looking at the apex proactively.
Turn 7
Nascar turn 2 - taken flat out in just about anything.
Turn 8
Right turn from the Nascar straight into South infield. Turn 9 is close enough to turn 8 that the two are taken as a combination in all cars. You do not need to hit the apex of turn 8 as long as you hit the apex of turn 9.
It is possible to brake very late for turn 8.
Because the oval is flat, unlike the infield, trailbraking through the entire oval width and turn 8 until the apex of turn 9 works great.
The transition in this direction is noticeable but almost flat. Compared to the other transitions this one should not cause any problems.
Turn 9
A second right very close to turn 8. Many cars will miss the apex in turn 8 by a couple of feet to hit the apex in turn 9 while driving a single arc from the turn in for turn 8.
Turn 10
A fairly sharp left following turn 9 almost immediately.
You can tap the brakes to settle the car going straight between turns 9 and 10.
Hit the apex and drive straight out to the track out curbing on the right.
Turn 11
Another left. Straighten the car momentarily between turns 10 and 11, then turn left into turn 11. The exit of turn 11 is also the apex of turn 12.
Turn 12
A right hander immediately following turn 11. As you are coming out of turn 11, touch the apex of turn 12 with your right tires and keep driving. The car is pointing off track but there is enough track width on the straight between turns 12 and 13 to finish the turn past the apex of 12.
Position the car almost all the way on the left for turn 13.
Turn 13
Turn 13 is an off camber right and might need a touch of brakes. In a high grip car it can probably be taken without braking.
Turn 13 has a deceivingly early apex and requires mental effort to turn in early enough not to miss it.
Turn 14
Another off camber right. This turn has a wide entrance but tighter exit and the track gets even tighter past track out coming into turn 15. A high grip car may be able to take turn 13 without brakes, in which case hitting the apex is crucial and getting most of the rotation before the apex is important as well.
Just like turn 13, turn 14 has a deceivingly early apex and requires mental effort to turn in early enough.
Turn 15
This is a left kink that can be taken flat out with a correct exit out of turn 14.
Turn 16
Right turn into an S combination. This is the slowest point on the track, and the exit of 16 is also the narrowest point on the track. Start very slowly until you know the track.
A diagonal line between the apexes of turns 16 and 17 seems to work well. Bigger cars may need more of an arc around the apexes if they cannot change direction instantaneously.
Turn 17
A long, tight and slow left. Many cars will follow the inside curb for much of this turn. Track out aggressively.
Turn 18
A right kink that should require a minor adjustment to the car's trajectory in just about anything.
Turn 19
A pretty fast left hander. The track banks at the apex, providing much more cornering grip compared to being anything more than a foot off. There is a bit of track distance between turns 19 and 20 to track out and come back left, but turn 19 should still be done as a late-ish apex.
Turn 20
Right hander onto the main straight. In reasonably grippy cars this turn should be taken without brakes. Despite the apex being clearly visible, many drivers apex this turn way too late. If you are only starting out on this configuration, brake early so that you are able to turn early. The braking should be finished by the time you get to the tire stacks on the left.
There is a bump/dip at the transition onto the oval. You should be flat out immediately after it, and carry as much speed over it as you can muster.
Car Specific Notes
Lap Records
No official lap records exist yet as this is a new configuration for 2013. However, a Spec Miata should be able to lap this course in 2:10.