Watkins Glen Track Guide
Published: May 10, 2013; updated: April 20, 2017
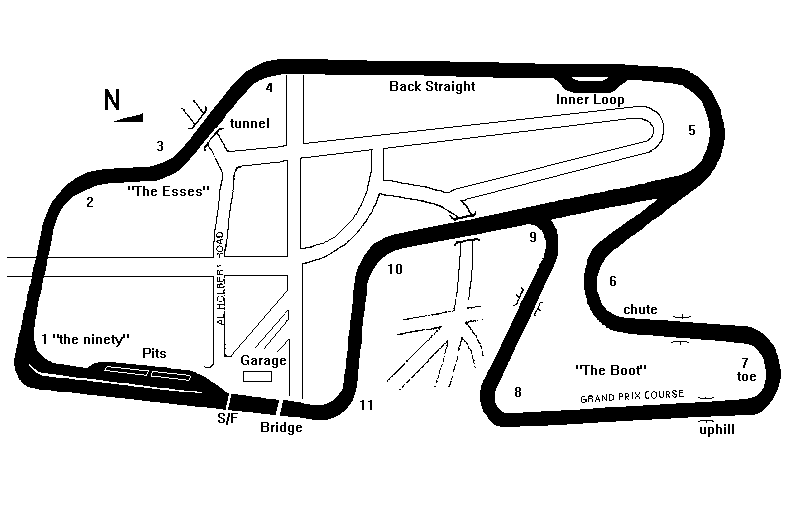
Watkins Glen has two configurations: a 3.4 mile "Grand Prix" / "Long" course and a 2.45 mile "Nascar" / "Short" course. This track guide will discuss the long course first, with short course differences afterwards.
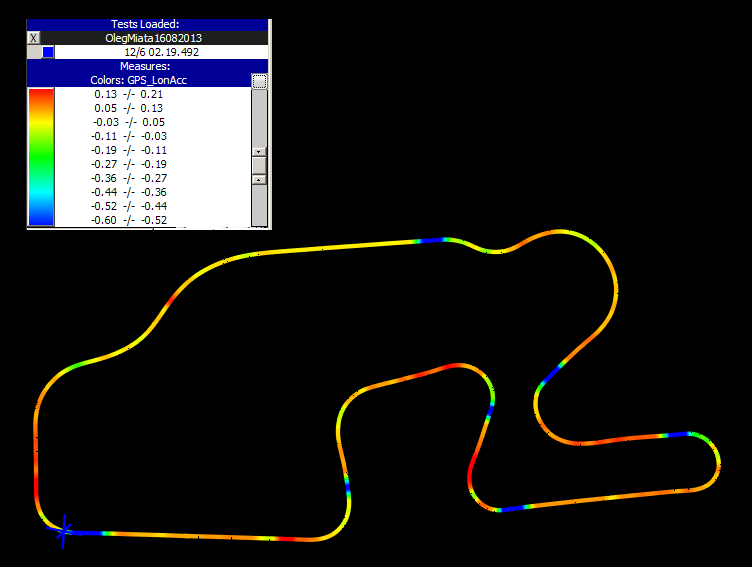
Here is a heat map for a Miata:
2015 Pavement Notes
Turn 1: the braking zone has much more grip than it did previously, reducing in siginificantly shortened braking distances for turn 1.
Esses: the concrete patches are gone and I think especially the higher power cars can take the upper portion of the esses much quicker. Lower power cars were full throttle from turn 1 to the bus stop on the old pavement and are just as full throttle with the new pavement.
Bus stop: the entry has more grip than before, resulting in shorter braking zones. The concrete patch is gone which means a wide variety of lines for bus stop entry are now competitive with one another.
Bus stop curbs: the curbs are now steeper, with the center points which are the highest above pavement being significantly high up. Driving over the centers produces a very noticeable drop as the car falls off the end of each curb, with an attendant upset for the suspension. The square ridges and valleys in the curbs' longitudinal profile are now more spaced out, resulting in a rougher ride and reduced grip. The car is likely to slide sideways quite a bit when taking the whole curbs under lateral Gs.
Turn 5: while the track has gained grip everywhere, it is likely that the cars will be coming out of the bus stop at higher speeds which will make turn 5 drive rather similarly to how it drove before.
Turn 6: similarly to turn 1, turn 6 has gained grip permitting significantly later braking application.
Turn 7: again similarly to turn 1 and more pronounced than in turn 6, turn 7 has gained a large amount of grip at the entrance permitting later braking and higher speed entries. Removal of concrete means the line can now vary in small amounts while yielding similar speed through the turn, whereas before concrete dictated where the car should enter turn 7 to a large extent (having both left and right tires on the concrete reduced available grip significantly).
Turn 8: I think the change in grip here is on par with turn 1. In low power cars very little braking is now needed for turn 8, and high grip cars can brake almost at the turn in point. Elimination of the concrete patch smoothed the turn entry significantly; cars which ran softer shocks due to the concrete patch in turn 8 can now be stiffened.
The pavement on the outside of the exit of turn 8 has been paved making it similar to turn 1 exit. Driving entirely left of the exit curb is considered a four off, just like in turn 1.
Turn 9: very similar to turn 8, elimination of the concrete patch makes a wide variety of lines competitive in turn 8 and the added grip from the new pavement reduces the braking required for the turn. Low power cars can brake as they are traversing the track right to center and turn in from the center.
Turn 10: lower power cars took turn 10 under full throttle, and this has not changed. I suspect that just like in turn 5, turn 10 will drive similarly to how it drove before because of increased exit speed out of turn 9 for higher power cars.
Turn 11: removal of concrete patches made turn 11 very much an enjoyable turn that can now be taken with the geometrically ideal lines. Uniformity of pavement throughout turn 11 contributes to increased driver confidence, given that there is zero runoff at the exit.
Turn 1
A 90 degree heavily banked right hander.
The line through turn 1 is quite close to a circular arc, that is, the line is not flattening as much as in a typical turn. The reason for this is banking - the car is moving uphill from the apex to the track out curb and therefore has a lot of grip that can be used for acceleration while remaining at nearly full lateral load.
In turn this extra grip makes mastering turn 1 challenging - it is a much faster turn than many drivers grant it. It is very easy to overbrake the car, and doing so costs dearly in lap time.
Turn 1 benefits greatly from trailbraking. I trailbrake up to 3/4 of the way across the track from the left side to the apex. The track goes downhill until the apex, and trailbraking provides front tires with the crucial additional grip to turn.
Scrubbing speed by understeering through the turn in phase is also significant. Turn 1 rewards a neutral handling car.
Use the apex curbing; right front tire should go over the flat part of the apex curb. If you do not hear and feel the tires driving over the apex curb, the car is missing the true apex by 2-3 feet.
There is a huge amount of runoff which is mostly utilized by racers. Even though the runoff area is paved, putting all four wheels left of the exit curb is considered a "four off" by many clubs.
Higher horsepower cars and 10/10ths driving attempts will want to (carefully) use exit curbing, at least the inside half of it that slopes up.
As lower horsepower or high grip cars can take turn 2 and the esses flat out, for them the back straight begins around the apex of turn 1 making turn 1 the most important turn on the track. Especially for lower horsepower cars gains in turn 1 are worth a huge amount in overall lap time.
Turn 2
You want a sufficiently late apex to set up for the esses, but not so late that you have to apply a lot of steering input at turn in which scrubs off speed. End of the curb is a good ballpark for the turn in point, but lower power and/or lighter car can start the turn earlier. In lower horsepower cars turn 2 should be taken flat out, medium horsepower cars may need to lift to rotate the car at entry, and high horsepower cars may need to just brush the brakes.
Turns 3-4
These are also knowns as the esses. It is a combination of right and left uphill sweepers.
Lower horsepower cars should continue to be flat out through the esses. Higher horsepower cars should get on power as early as possible after turn 2 and stay flat out until the braking zone for the bus stop.
A good way to work on increasing your speed through the esses in higher horsepower cars is to short shift into the next higher gear and go flat out through them in the higher gear. Then move the shift points down track, a car length at a time.
Lower horsepower cars, especially with experienced drivers, can take a variety of lines through turns 3 and 4 while remaining comfortably flat out. Higher horsepower cars and less experienced drivers would often use the end of the curb on the right side of the track between turns 3 and 4 as the turn in point for turn 4.
Bus Stop
A chicane on the back straight that is faster than it looks, and can be made even faster by aggressively - but thoughfully - cutting the curbs.
The curbs on the left side are fairly steep and are best avoided. Curbs on the right side can be cut in softer sprung cars. In particular, cutting the exit curb on the right straightens the exit substantially, allowing for a lot more speed to be carried through. I have a separate write-up on this here.
Less experienced drivers normally brake for the bus stop in a straight line and hold their speed through the bus stop, accelerating once they clear the third curb if not the fourth one.
The fastest line through the bus stop is to brake into it, until the apex curbing on the right, and then be on power from that point forward, cutting exit curbs as necessary to stay flat out. Lower horsepower cars can pull this line off without using curbs; higher horsepower cars will need to cut the exit curbs to stay flat out.
Turn 5
Blind, fall away late apex right sweeper.
Start by tracking out 3/4 of the track width after the bus stop, then do a very slow tightening of the line toward the apex. When you see the apex, stand on throttle, touch the apex and track out all the way to the left edge of the track. Stay off exit curbing as there is no runoff available should the car go sideways over it.1
High grip, low horsepower cars can execute turn 5 flat out. Most people lift on entry. High horsepower cars might need to brush the brakes. Because there is a short straight following, you want to execute a late enough apex to be on power as early as possible.
Turn 6
A downhill left. More speed can be carried through this turn than it first appears. The obvious line is somewhat late which costs a bit of exit speed and a lot of time in corner entry; in a lower horsepower car especially turn in a bit earlier and carry more speed through the turn. Trailbraking deep into the turn works well.
In the mornings the braking zone into turn 6 remains in the shade, and as such the track surface there is colder than on the rest of the track. Especially in the first laps on cold tires it is wise to be careful approaching this turn.
Turn 7
Fairly sharp right, uphill, large elevation gain.
Lower horsepower cars need to enter the turn at the highest speed possible because they cannot accelerate up the turn much if at all. A "secant" line through the turn can work well. Unlike most corners, you will not be accelerating at track out even when flat out, therefore initial turn in can be very aggressively early.
Higher horsepower cars prefer more of a "standard" line through turn 7.
Because the car is going uphill, gravity provides additional grip. As a result the initial turn in can be quite sharp and aggressive, more so than in other, vertically flat corners. Even in understeering cars this can provide good turn in, especially if brake release is appropriately timed.
Turn 8
Fairly slow right hander.
Do not apex early as it will cost time in the 8-9 straight.
There is a groove right at the edge of the curb on the inside of this turn. Placing the right front tire in this groove makes the turn effectively slightly banked, thus increasing grip. When I hit the groove I was able to comfortably start accelerating way before the apex.
Turn 9
Still slow left. Lower horsepower cars will want a slightly earlier apex in this turn, and follow the inside edge of the pavement for about a foot at the apex. Higher horsepower cars will want a late enough apex to achieve full acceleration before it for the following straight.
Turn 10
A deceptively fast left.
Most people brake too much for this turn and take it too slowly. Use the entire track width at the exit; runoff beyond the curb is paved and can be used when the turn is taken too fast.
The curb is "dented" at the apex, allowing a little bit of additional steering to be added just around the apex.
High grip, low power cars can take turn 10 flat out.
Turn 11
A right hander leading onto the main straight, with the outside wall very close to the edge of the track at the exit.
Discipline is required to not apex this turn too early. Most cars will want to be on full throttle at the apex.
The ideal line through turn 11 is tricky. There is not as much grip on the concrete patch as there is on pavement, however the concrete patch is right where the school line is and not getting on it is difficult to say the least. I had reasonably good success with turning in at the patch but going outside off of it halfway into the turn. This allows me to get on the power a bit sooner, but with a wider arc the wall comes up faster. Trying to turn in after the patch appears to be somewhere between hard and not advantageous.
Similarly to turn 8 there is a groove right at the edge of the curb which effectively banks the turn a bit and provides that extra grip to get on throttle before the apex.
Short Course
Short course eliminates the boot.
Turn 5 becomes longer but not sharper; track out as far as is necessary but not further. Lower horsepower cars will not need to track out all the way to the left.
Entry speed in turn 10 becomes significantly higher, with braking required in all cars. Still, lower horsepower cars will not need to brake much.
Rain Lines
The rule of thumb for rain lines is to stay off the concrete as much as possible. Because concrete patches frequently follow the ideal dry line, rain lines are often a decision between turning in earlier or later than ideal.
Main Straight
There is an asphalt patch on the left of the track which ends just before the 400 marker for the braking zone in turn 1. In the dry braking happens after this patch, however in rain braking begins over this patch. In rain it is shinier than surrounding pavement.
There is more grip available in the center of the track than over this shiny patch, however the entry into turn 1 becomes significantly sharper as you are giving up a third of the track width.
Turn 1
A rain option is to do a rimshot around turn 1. There is a shiny/slick patch roughly following the dry line through 1; keep your left tires left of the patch as you go around turn 1.
There is a lot of banking in turn 1, making this one of the first turns to dry when rain stops.
Turn 2
An option is to turn significantly later and stay on the left half of the track between turns 2 and 3. Cross over from left to right about midway between turns 2 and 3. You will see that the left half of the pavement is asphalt while the right half has the concrete patch.
Turn 3
Stay right of the concrete, roughly on the right half of the track. Cross over to the left approximately midway between turns 3 and 4.
Turn 4
Stay track center, just left of the shinier pavement which is on the inside. Do not track out any more than necessary until reaching the normal track out point.
Bus Stop
Water tends to accumulate on the far left of the track. A rain option is to brake approximately track center where the pavement is not as shiny.
Turn 5
You absolutely do not want to put any part of your tires over the painted white line or the curbing at the exit of turn 5 in wet.
Turn 6
A rain option is to not transition all the way to the right entering turn 6. Chances are you cannot put the power down and accelerate through the entire turn anyway, at which point you will save time by staying track center at the entry. Also, the right half of the pavement coming to turn 6 is slicker than the left half.
Turn 7
There are two popular rain options through turn 7.
One is to enter just left of the concrete patch, stay left until maybe a third of the way up, then cross over the patch, hit the apex on the right (which will be very late), and power out almost parallel to the track.
A second option is running a rimshot and staying left of the concrete patch the entire way around the corner.
Because of elevation change in this corner, in drying conditions a slightly later apex may be all that is needed to put the power down from the apex forward while tracking out all the way.
Turn 8
The concrete patch roughly follows the geometrically ideal line through turn 8 but unlike turn 7 does not touch the apex. The better rain option is typically to wait until just after the patch to turn in, with the left wheels initiating the turn left of the patch, then cross the patch halfway between turn in and apex and touch the apex.
Staying completely inside of the concrete with the right tires or completely outside with the left tires is possible but likely slower.
Turn 9
There is again a concrete patch through the entire turn and shiny/slick pavement just outside of the concrete. One option is to stay completely inside the concrete with the left tires, which is also a potentially good dry line. Another option is to do a rimshot staying right of the shiny asphalt. There tends to be more standing water on the outside. A third option is to simply run a later apex, crossing over the concrete in the middle of the turn.
Turn 10
One option is a rimshot on the right side. Because there is substantial banking in this turn it is likely to be one of the first turns to dry, at which point a line close to dry line but with a slightly later apex might work better.
Turn 11
Later than usual apex and touching the apex is likely to be the best line through turn 11.
Videos
Yours truly in a Miata, 2:22:
Short Course
Yours truly in a Miata, 1:33:
Other Resources
- At NASA SpeedNews
- At Axis Of Oversteer
- At Trackpedia and for racers
- At brakeswap.com blog
- At SCDA
- At Potomac PCA
- At Boston BMWCCA
Lap Records
I think this is what makes this curb slippery.
-
Unlike most curbs which are elevated, the exit curb in turn 5 is flat. ↩